

Music Settings Guide
Overview
When you access the music feature through your dashboard, you’ll discover four essential tabs that work together to create a complete music experience for your stream. Before diving into detailed configuration, it’s helpful to understand what each tab does:
Player - This is your actual music interface that needs to remain open during broadcasts. Think of it as the control room where music plays from and where you can monitor your queue.
Settings - The command centre where all configuration happens. This should be your first stop before using any music features.
Widget Settings - Where you design the visual display that shows your viewers what’s currently playing on stream.
Banned Songs - Your content filtering system to prevent unwanted music from appearing in your queue.
Essential Configuration
Your journey begins in the Settings tab, which contains all the fundamental options you’ll need to configure. Let’s explore each section to understand how they shape your music experience.
Primary Controls
The foundation of your music system rests on four key toggles:
Enable Music Player - The master switch that activates the entire system. When disabled, no music functions will work.
Enable Song Requests via Command - Allows your community to request songs through chat commands, either by searching or sharing links.
Enable Song Requests via Channel Points - Integrates with Twitch’s reward system, letting viewers spend channel points to request songs. This requires additional setup in your Rewards section and bypasses permission restrictions.
Enable AI Remark - Adds personality by having the AI comment when songs are added. The text field accepts customisation with variables like {user} and {song}.
Command Setup
Your music system is controlled through chat commands that you can customise to match your stream’s style.
The Song Request Command (default: !sr) is what viewers type to request music. You can change this to anything you prefer, but remember the exclamation mark is essential as it signals to both Twitch and the bot that a command is being issued.
Here are some examples of commands you can use:
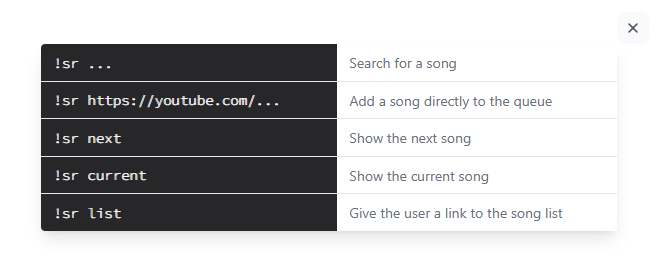
You can control who can request songs through a dropdown menu with options ranging from “Anyone” to “Broadcaster only.” This helps you manage access based on your community’s size and culture.
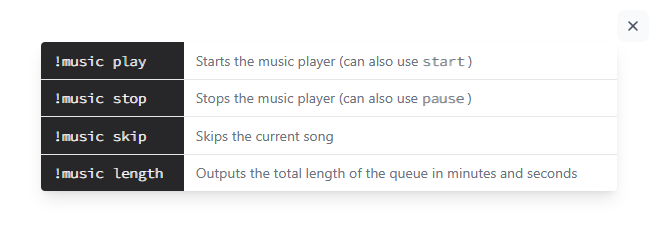
Similarly, the Song Moderation Command (default: !music) controls who can manage the queue through commands like skip, clear, or show current song. The who can moderate songs setting helps you restrict these powerful controls to trusted community members.
Here are some examples of commands you can use:
Music Sources
Your music player needs at least one content source to function properly. Currently, YouTube is the primary option available. Simply toggle it on to enable YouTube integration.
When YouTube is enabled, you’ll have access to several important settings:
Allow unlisted videos - Determines if non-public YouTube videos can be requested.
Restrict to Music Category only - Helps keep requests focused on actual music rather than other content types.
YouTube Safe Search - Offers filtering levels (None, Moderate, or Strict) to prevent inappropriate content.
Default YouTube Playlist - Specifies a playlist that supplies songs when your queue is empty, ensuring continuous music.
Queue Management
These settings help you maintain control over your playlist’s composition:
Minimum/Maximum Song Length - Prevents very short clips or excessively long tracks from disrupting your queue’s flow.
Maximum Requests Per User - Limits how many songs each viewer can have in the queue simultaneously.
Maximum Queue Length - Caps the total number of pending songs, helping manage expectations during busy streams.
Message Customisation
The Text Outputs section allows you to personalise how the bot communicates about music events in your chat. Each field represents a different scenario, with many including special variables (merge fields) that insert dynamic information:
- Song Queued: Uses {song}, {user}, and {position}
- List: Uses {link}
- Current Song: Uses {song} and {user}
- Next Song: Uses {song} and {user}
- Max Requests: Uses {count}
- Song Too Short/Long: Uses {song} and {minutes}
- Moderation Command: Total Length: Uses {minutes} and {seconds}
There are also fields for various error states such as Queue Full, Requests Disabled, and Invalid Request, allowing you to craft helpful responses for these situations.
Final Steps
After configuring all settings to match your stream’s needs, remember to save your changes before proceeding to the Widget Settings tab. Finding the perfect configuration might require some experimentation, so consider testing during a private stream before going live with your new music system.
The music feature creates a powerful way to engage your audience through shared musical experiences. While it requires careful initial setup, the payoff is a more dynamic and interactive stream that viewers will appreciate.